Wednesday, December 18, 2013

Hearty Quinoa Fried Rice

Honestly, who doesn't love fried rice? Our Thighs. Sometimes I can't resist, but I find that the empty carbs & loads of soy (gluten) just wasn't worth it. Guaranteed food hangover if you ask me.

But wait! There's a healthy alternative (isn't there always? ;) ). Packed with protein, quinoa fried rice is relatively lite & very satisfying. Unlike rice, the quinoa retains it's moisture when you reheat it. This means this recipe is great for meal planning. The batch will be huge, so saving the left-overs pre-portioned in zip-lock containers (frozen or refrigerated) is always a plus.


Ingredients
1 C quinoa
1 1/2 C low or no sodium chicken stock
1/4 small onion, chopped
2 carrots, peeled & chopped
3 scallions, chopped
3 garlic cloves, minced
1/2 tsp fresh ginger minced
1 tablespoon E.V.O.O
Whites of 4 eggs, whisked
1/2 C frozen peas
1 1/2 tablespoons teriyaki sauce
2 1/2 Tbsp tamari, otherwise known as gluten free soy sauce
3/4 Tbsp toasted sesame oil


Tip: The type of teriyaki sauce is your choice. Try Whole Foods for a gluten free option. If you can handle a little gluten in your diet, any type will work.

1) Rinse quinoa well in a strainer. Cook as directed on the box, using the chicken stock instead of water. When it's done, throw it in a container that seals well, and pop it in the freezer.

2) Combine tamari, teriyaki sauce, and sesame oil in a small bowl and set aside. Heat 1/2 Tbsp olive oil in a large sauce pan over high heat

3) Follow this rhythm as you stir frequently....
- Add onion and carrots
Cook 2 minutes
- Add scallions, garlic and ginger
Cook 2 minutes
- Add the rest of the olive oil & the quinoa
Cook 2 minutes
- Stir in the sauces
Cook 2 minutes
- Pour in eggs and stir well
Cook 2 minutes
- Throw in peas and remove from heat. Stir well until the peas are thoroughly warmed.

4) Serve and enjoy while hot!


Make sure to sip wine while cooking ;)


Tuesday, December 10, 2013

Plantain Paleo Lasagna / Pastelon

I'm afraid I've gone on blogger's hiatus since my last post. I've been cooking all along, but was a bit discouraged by some negative feedback left on Instagram. So please, try my recipes. I write or re-write them so that the reader can replicate each dish easily. All tips, comments, and concerns are welcome! - but be kind in leaving your opinion.

Plantain Paleo Pastelon
Sounds strange, right? My boyfriend is half Puerto Rican and loves plantains. So when I stumbled upon the idea and ran it by him, he was thrilled to try. By no means is this a traditional dish (it's technically a pastelon with a twist), but oh man is it good. A perfect marriage between sweet starches and ground turkey, that will leave you feeling healthy and satisfied. It's like a savory-sweet cross between sheppard's pie and lasagna, it's to die for, and your body will thank you - this recipe follows the paleo diet.

Ingredients:
1 lb lean ground turkey
1/2 C gluten free rolled oats, chopped
4-5 ripe plantains - They need to be ripe for the sweetness, but not too ripe or it will be harder to cut "noodles" out of them.
1 onion, chopped
4-5 garlic cloves, minced
1 yellow bell pepper, chopped
2 tsp oregano
1 bundle cilantro, chopped
1/2 C diced pineapple - If canned, try to make sure it's organic or no sugar added.
1/2 C organic tomato sauce
2 bay leaves
Egg whites of 8 eggs, whisked - 4 eggs if you don't have enough on hand
4 Tbsp extra virgin coconut oil


How it's made:

1) Preheat oven to 350 F. Grease an 8 x 8 in. baking pan and set aside.

2) In a large mixing bowl, combine turkey, oats, onion, 2 cloves worth of minced garlic, bell pepper, and oregano. Mix well with hands.

3) Heat 1-2 Tbsp coconut oil over medium-high heat. Add about half the remaining garlic and let cook 1 minute of so, allowing it to  become fragrant. Then add the turkey mixture to the pan. 

4) Once the turkey has browned, add pineapple, tomato sauce and bay leaves. Simmer while covered on medium low heat, check back to stir every now and then. 

5) Meanwhile, heat the coconut oil in a pan on high, then fry the plantains until they are slightly brown on each side. Remove plantains from the hot oil and let them cool on a plate with paper towel. Once cooled enough for handling, line your baking pan with one
layer of the fried plantains. 

6) Remove bay leaves, and add cilantro to the turkey mixture. Stir well and remove from heat. Pour turkey mixture over first layer of plantains and spread evenly. Drizzle eggs over the turkey mixture. Layer the top with plantains, much like you've done you with the bottom layer.

7) Bake for 25-30 mins. Make sure your dish has set in the oven. Cook for 10 minutes, cut, and enjoy!


...it's to die for.


Tuesday, November 26, 2013

Goat Cheese Turkey Bacon Chicken "Cordon Bleu"

We've been doing a lot of grocery shopping and trying a bunch of new things, but my freezer filled up. What to do when you run out of room? Get creative.

"Kelsey Cordon Bleu"
INGREDIENTS - Serves Two.

2 Tbsp E.V.O.O
1 Large Chicken Breast
3 Cloves garlic, finely minced
2 tsp thyme 
Fresh ground pepper
1 1/2 Tbsp goat cheese
1-2 Slices turkey bacon
Cooking spray
1/2 Large sweet onion, cut however you wish


Here's what to do...

1. Lightly tenderize - not pulverize - your chicken breast. Preheat frying pan on high. Preheat oven to 350 - 375 F (depending on your oven). Rub breast with 2 Tbsp E.V.O.O., minced garlic, and thyme.

2. Sear chicken breast on both sides, and reduce heat to med-high. Add as much ground pepper as you'd like. Continue to cook until little pink remains in the center. The breast will look cooked but the juices will not run entirely clear. Remove from heat and set pan aside. Carefully cut breast in half, like a hamburger bun.

3. Spread goat cheese over the insides of the hot chicken breast as it melts. Lay 1-2 turkey bacon slices, and close breast. Place on baking pan lined with tin foil and cover with tin foil as well, poking about 3 holes in the top. Bake for 30 minutes.

4. Using the frying pan that seared the chicken with the juices and oils remaining, saute onions on medium heat. When they begin to dry out, reduce heat to low, and continue to cook until slightly crunchy.

5. Assuming you're adding a side item or two to your dish, I suggest a half breast per serving. Top with the crunchy sweet onions and enjoy.


Make larger portions if you're looking to impress. This recipe is easy and will have your guests talking for ages. For another variation, try using a little balsamic vinegar when caramelizing your onions, but do not let them become crunchy.  


Bon Appetit!


Monday, November 18, 2013

Spaghetti Squash Alfredo

We love spaghetti squash! Even with it's little bit of crunch, the texture and taste are similar to spaghetti. This recipe is not clean, but it's tasty, low fat, and a great alternative fettuccine. I also tried to make it lactose free, however the small amount of cream cheese sort of got in the way. But hey, everything good in moderation, right?

Here's what you'll need:
*1 med. size spaghetti squash
*1 Tbsp Earth Balance Buttery Spread Please refer to a previous blog of mine for information what Earth Balance is.
*3 cloves garlic, finely minced
*2 Tbsp gluten free all purpose flour
*1 C fat free lactose free milk
*1 Tbsp fat free cream cheese
*1 C grated Parmesan cheese
*1/8 tsp fresh ground pepper


1) Preheat oven to 350 F. Meanwhile, cut squash in half. Remove the inside seeds, then place squash face down on a foil-lined pan with a half inch of water in it. Bake for one hour. When it's done, gently fork all "spaghetti strands" to the center.

2) Heat Earth Balance in a small pot over medium-low heat. Once hot, add garlic and saute for 1-2 minutes. Whisk in flour until no lumps remain, cooking for about another minute. Whisk in milk.

3) Once simmering, add cream cheese and stir until smooth. Remove from heat and quickly stir in cheese and pepper. Separate sauce evenly between both shells, and toss with spaghetti strands. Add additional cheese and pepper to the top for broiling. Broil in oven until cheese on top begins to brown. 

4) Remove from oven and let sit! The moisture from the squash being in the oven will cause the mixture to turn out a little watery. Let it sit for about 10 minutes so that the content can thicken up. Don't worry, dinner will still be hot when it's ready to eat!


One squash is enough to feed a family of four. Pairs great with chicken. Thanks for visiting! Enjoy and pass it on!

Monday, November 11, 2013

Moist Gluten Free Persimmon Cookies


         Here in the Silicon Valley, the leaves are turning and persimmons are ripening! I'm lucky enough to have a tree in my backyard, so I thought I would take advantage of having the fruit before the birds did. If you aren't familiar with persimmon cookies, you should know they are very festive tasting - 'tis the season! If you like pumpkin pie, gingersnaps, or carrot cake, you're going to love the flavors that this recipe has to offer. I tweaked the original  to make it more healthy. My version is gluten free, and dairy free with other modifications, so you don't have to feel bad about indulging.


You're going to need the following...

2 - 3 persimmons


1/2 C Organic Earth Balance Buttery Spread - I use this spread because it tastes just like butter but the nutritional facts are more appealing than E.V.O.O. If you don't have it, and aren't willing to make the purchase, any type of shortening is ok. 

1/2 C Truvia - this is a sugar substitute and it's a stevia product


Eggwhites of 3 eggs

4 C Gluten Free Rolled Oats

1 tsp. baking soda

1 tsp. ground cinnamon

1/2 tsp. ground nutmeg

1/2 tsp. ground cloves

1 C chopped walnuts

1 C golden raisin


Here's how you make them... 

1. Chop almonds. Peel, de-stem, and process persimmons to a puree (enough to equal 1 cup). Preheat oven to 350 F and grease cookie sheet. Lay foil on cookie sheet for easy cleanup. 

2. In a medium bowl, cream together Truvia and Earth Balance. Beat in egg whites and persimmon pulp.

3. Chop oats in food processor until they have a flour-like consistency. In another bowl, combine the oats, baking soda, cinnamon, cloves, and nutmeg.Stir dry mixture into the persimmon mixture

4. Stir in walnuts and raisins. Drop 1-1.5in rounded spoonfuls onto cookie sheet. Bake 8 to 10 minutes and let stand 5 minutes on cookie sheet before moving to cooling rack. Check your cookies at 8 minutes. They have a cake like consistency so if you let them begin to brown, the bottoms will be burnt. This also helps them maintain their moisture. 


Enjoy!

Monday, November 4, 2013

Fall hike! Have you ever seen a cactus the size of a small house?

Sunol Regional Wilderness


          Sunday's forecast was in the 70s so we decided to take advantage of it by going for a nice fall hike. Sunol Regional Wilderness, apart of the East Bay Regional Park District in the Bay Area, is just a hop-skip away from reality, with a hint of cell phone service. I've done this hike once before last fall, so I though i'd introduce my boyfriend to this little hiker's Paradise.


          We did the Indian Joe Creek Trail / Hayfield Road loop, which is only about 2.41 miles. I usually prefer a longer hike but it's more of a scenic hike, meant to be enjoyed at your own pace. Plug 1895 Geary Rd. Sunol into your GPS and head out! When you reach the park, depending on the day, they'll charge you $5 dollars for parking. These trails are dog friendly, for a small fee! Parking is abundant at this spot.


          This bridge crossing over a creek marks the trail head. Before you cross the bridge, note the sign on the right which will tell you about which wildlife to be aware of. Rattlesnakes, ticks, and other expected creatures are among the listed ones, but keep an eye out for surprises! Last year on the drive in, we spotted this scrawny tarantula crossing the street.


          Above is a map of the loop we did. Follow the Indian Creek Trail up, and take the Hayfield Road trial down. The terrain isn't difficult, but may be a little loose in some parts due to sand and dry weather. I suggest picking up a quality pair of trail running shoes or hiking boots because you just don't reap the full benefits of the hike in running shoes - grip is key. Expect to be going mostly uphill on Indian Joe, and downhill on Hayfield Road. 


          Don't think you're going the wrong way when you come across a fence in the first half mile. Proceed through, but make sure shut the gate behind you because there are roaming cows throughout the loop. If you refer to the map above (or the one provided by the ranger on site), you can see where the trail splits off to Hayfield. However, on the trial you'll find it a little bit more difficult. There's a post to mark where Hayfield is, but some of the letters have been rubbed off. The best way I can describe it to you is that when you reach the black boulders, you've gone only a few steps too far.


More pictures from the hike...


         A few moments after you start heading down, look to your right. Have you ever seen a cactus the size of a small house? You can't miss it! Pipes are routed to the cactus to bring it water continuously throughout the year. I imagine it's been here for a long time. You may want to get as close as possible to the cacti for a better photo op, but be ware of cows with calves!  Earlier in the hike we walked around one who seemed to be confrontational when standing in our way. Needless to say, we found a way around. Bessie (I just named her, she's in the picture above) was a sweet cow who seemed happy to see us. On the other hand, because of the water feeding the cacti, the cows seem to congregate by herd around it. We got a little too close and they started making loud noises.We quickly left the area, while realizing that a full grown bull had been watching us! If you don't pose a threat and keep your distance, you will be safe.


...and it goes back even further!
The picture doesn't do it justice, you must go see it first hand! If you'd like more info in this trail, please click here. Weekend Sherpa is a website built for California locals and outdoor enthusiasts. Sign up to receive new gems in your inbox every Thursday morning. From hiking, to camping, to wine tasting - it's all good! All adventures are specific to Northern and Southern California, depending on where you live.


Make sure to visit Sunol Regional Wilderness. There are so many more trials and sites to see!
Thanks for visiting, come back soon.


Wednesday, October 30, 2013

Last day to carve pumpkins!!

Toast your seeds for a sweet and savory snack.

I'm a Northwest girl at heart, and where I'm from we carve pumpkins much earlier in the month. For my first time carving pumpkins in the Bay Area, I forgot to take the warmer weather into account. We carved on week two of October and by the third day the pumpkins were white and fuzzy with mold! Even though the jack-o-lanterns didn't work out, we were able to bake some really yummy seeds! Tonight, being the last night before Halloween, we are going to try carving once again. Good thing we are, because it reminded me to share this pumpkin seed recipe with you! Originally we were trying to follow this recipe, but it was getting late and we were missing a few pieces. Lagging about half the ingredients, this is what we did and they turned out perfect.


Ingredients

1 medium size pumpkin
8 stevia extract packets
1 tsp of granulated sugar for texture
1/4 tsp. ground cumin
1/4 tsp. ground cinnamon
1/4 tsp. ground ginger
Red pepper flakes to taste
1 1/2 Tbsp. hazelnut oil


1. Preheat oven to 250 degrees F. Line baking sheet with parchment paper. Using which ever method you prefer, separate seeds from pumpkin flesh.This should yield about 1 cup. 

2. Spread pumpkin seeds over paper in an even layer. Bake until seeds are dry, which should take about 1 hour, stirring every 15 minutes.

3. In a medium bowl, combine cumin, cinnamon, ginger, and red pepper flakes. In a non-stick pan, heat hazelnut oil over high heat. Add pumpkin seeds, stevia, and sugar and let cook until sugar starts to melt (about 45-60 seconds), stirring frequently. 

4. Add seeds to spice mixture and stir well. Return seeds to parchment paper for cooling. Once they are cool they may be kept in an air tight container for up to 1 week. That is, if they last that long.


             I hope you enjoy my recipe! It is super easy and fun to make with loved ones.

Cook, enjoy, pass it on.

HAPPY HALLOWEEN!


Tuesday, October 22, 2013

Crock Pot Turkey Pad Thai, a healthy alternative to take-out.


I'll be the first to admit, I'm the queen of making the easiest meal the most difficult. I modify portions, change the process, and play with ingredients. What I like about the crock pot is that no matter how many changes I make, the directions are still basically the same: Throw it in, let it sit, stir occasionally. 


Dinner made easy. 


Talk about green ingredients!
     1/2 cup hot water
        6 packets stevia extract 
        2 tbsp rice vinegar
        2 tbsp organic low sodium tamari, which is gluten free soy sauce 
        1 tbsp chili garlic sauce
        1 lime, juiced 
        1 tbsp extra virgin O.O.
        1 tbsp sesame oil
        1 tsp onion organic powder
        1 raw turkey breast tenderloin, cubed
        2 cup broccoli slaw, packed, 
        1 cup bok choy, chopped and packed
        1 cup napa cabbage, chopped and packed
        1/2 cup cilantro packed
        1/2 med. onion, sliced 
        3 garlic cloves, minced
        3 scallions, chopped
        2 tbsp sesame tahini
        8 quinoa or any gluten free spaghetti / Asian style noodle

Before
1) Combine water, stevia, vinegar, chili garlic sauce, and lime juice to crock pot. Turn on low heat and let set

2) Using a medium sized sauce pan, heat olive oil on high heat. Chop raw turkey into small half inch size cubes. Add the sesame oil to the pan, and brown the turkey. Add onion powder while turkey is cooking.

3) Add browned turkey, broccoli slaw, bok choy, onion, garlic, cilantro, cabbage, and scallions to the crock pot. Stir mixture, and let cook for six hours on low. Stir every half hour if you can, but don't fuss if you miss an hour or so ;)

4) Cook your pasta according to package directions, without adding any butter or salt! While pasta is cooking, add tahini to the cock pot mixture. This thickens the mixture slightly and adds a little bit of a nutty flavor. This was our first time using tahini, it's sort of like a healthy peanut butter.

5) Toss pasta with the Pad Thai mixture and enjoy!!


A few pointers......

Make sure to keep the veggies from sticking to the side of the pot, above the mixture line. This will prevent any burning!

This is another recipe that makes quite a bit of food, most likely suitable for a family of 4-6 people. Remember, you can always use the left overs as pre-portion mini meals, and pop them in the freezer!

Obviously, this is not the most photogenic meal on the planet. Here is a picture of what the Pad Thai should look like in the cock pot when it's done. I promise it's a million times tastier than it looks!

After


I hope everyone enjoys my version of a slow-cooker Pad Thai. Don't tell your kids there's veggies, they'll never know ;)

Happy eating!

Monday, October 21, 2013

Let's start with a recently discovered favorite..

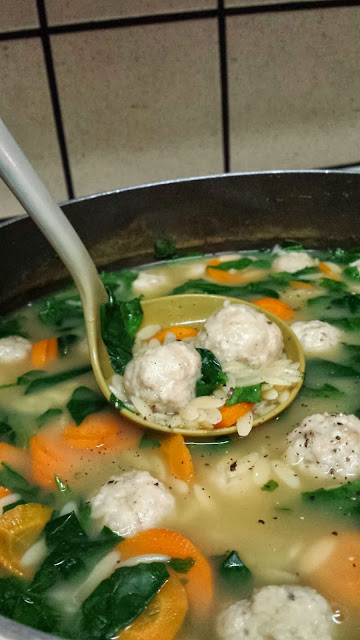
A clean eating rendition of wedding soup.


Have a cold, feeling cold, or even hung over? ;) This recipe is amazing. I found myself craving some sort of chicken wedding soup a few weeks ago when I was feeling under the weather. My boyfriend and I have gotten into clean eating recently and we're willing to try anything. When you start following me you may find that I share 3-4 recipes a week; all of them are along the lines of clean eating, paleo, and detox worthy (or easily modified). 

Cuddle up in some sweatpants, throw your hair in a pony-tale, and enjoy a bowl of chicken soup with mini turkey meatballs with a loved one. I provided the original recipe link just above, but you will notice we made quite a few modifications to make the meal healthier. 

You will need the following ingredients...          
  • 1lb pound or package lean ground turkey
  • 1/4 cup cold water
  • 3 egg whites
  • 1/3 cup finely minced onion
  • chopped oats (1 cup) to make it gluten free
  • 1/2 cup freshly grated Parmesan
  • 1/2 teaspoon salt This recipe does not need salt!  Chicken broth is hard to find with out added sodium. 
  • Freshly ground black pepper to taste. In the spirit of traditional Italian wedding soup 
  • 10 cups chicken broth We used Trader Joe's low sodium organic chicken broth. 
  • 2 large carrots, chopped
  • 1 cup orzo, but you could also use quinoa or bamboo shoots
  • 1 6oz bag of spinach cut the leaves how ever you prefer

1) In a large bowl combine turkey, water, egg whites, onion, oats, cheese, and as much black pepper you'd like! If you froze the turkey ahead of time, the mixture may not be quite pliable as you prefer, so it's ok to throw in a little gluten free flour to thicken the meatball mixture. Form to 1 inch balls and set aside.

2) In a large pot, bring broth and carrots to a simmer, add orzo, and cook for 5 mins. Stir frequently. This is also a great time to add more ground pepper to the broth. Don't be hesitant, it's the right type of spicy for the soup!


3) Add meatballs to broth and simmer for 10 minutes.Stir in spinach for 1 minute or until slightly wilted. Serve with a ladle and top with a little more cheese and pepper if you'd like!


We had a blast making this, and now we've done it a few times. This makes a HUGE batch so it's great for meal planning and such. We get the microwavable Zip-Lock containers and freeze them pre-portioned. 

Thank you for visiting my blog, hope to see you back for more... 


#weddingsoup #meatball #chicken #chickensoup #meatballsoup #groundturkey #eatclean #cleaneating #carrotlover #spinach #spinachlover #healthyliving #healthycooking #fitness #getinshape #stayinshape